Memory Installation Guide for Compaq Presario R4000 & HP Pavilion zv6000 series Laptop computers.
There are two memory slots: one is on the bottom of the laptop, one is under keyboard.
1. Before you begin any removal or installation procedures:
(1) Shut down the notebook. If you are unsure whether the notebook is off or in hibernation, turn the notebook on, then shut it down through the operating system.
(2) Disconnect all external devices connected
to the notebook.
(3)Disconnect the power cord. For memory module on the bottom of laptop:
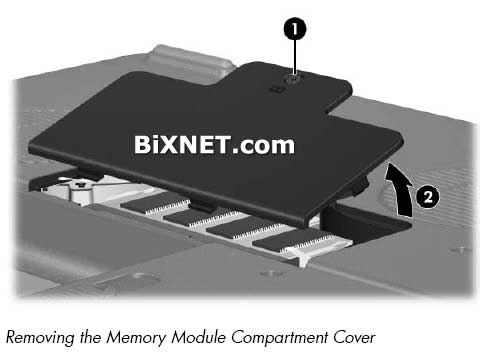
2.Loosen the PM2.0×7.0 screw (1) that secures the memory module compartment cover to the notebook.
3.Lift the rear edge of the cover (2) up and swing it toward you.
4.Remove the memory module compartment cover.

5.Spread the retaining tabs (1) on each side of the memory module socket to release the memory module. (The side of the module opposite the socket rises away from the notebook.)
6.Slide the module (2) away from the socket at an angle.
7.Remove the current memory module if the memory slot is occupied.
*Note:Memory modules are designed with notches (3) to prevent incorrect installation of the module into the memory module socket.
 Reverse the above procedure to install a memory module.For memory module under keyboard:
2.Turn the notebook upside down with the rear panel toward you.
3.Remove the four PM2.0x15.0 screws that secure the keyboard cover to the notebook.

4.Turn the notebook right-side up with
the front toward you.
5.Open the notebook as far as possible.
Notes: Steps 6 through 10 apply to HP Pavilion zv6000 models. See steps 11 through 15 in
this section to remove the keyboard cover on Compaq Presario R4000 models. 6.Place a piece
of masking tape on the left display hinge to protect the display hinge from being damaged
by the removal of the keyboard cover.

7.Press down on the label area of the keyboard cover (1) to release the keyboard cover hook from the notebook.
8.Lift the right side of the keyboard cover (2) and slide the right side of the cover toward the notebook rear panel.

9.Continue pressing down on the pressure points on the keyboard cover (locations indicated by 1, 2, 3) to release the keyboard cover hooks from the notebook. As you do so, continue lifting the right side of the keyboard cover and sliding the cover (4) toward the notebook rear panel.
10.Remove the keyboard cover.

Steps 11 through 15 apply to Compaq Presario R4000 models.
11.Insert a flat blade screwdriver into the notch (1) behind the insert key and lift up the right side of the keyboard cover (2).
12.Lift up on the middle (3) of the keyboard cover until it disengages from the notebook.

13.Lift the rear edge of the keyboard cover (1) and swing it forward until it rests on the keyboard.
14.Release the zero insertion force (ZIF) connector to which the volume board cable is attached and disconnect the volume board cable (2) from the system board.
15.Remove the keyboard cover.

16.Remove the four PM2.0×4.0 screws that secure the keyboard to the notebook.

17.Lift the rear edge of the keyboard and swing it forward until it rests on the palm rest.

18.Release the ZIF connector (1) to which the keyboard cable is connected and disconnect the keyboard cable (2) from the system board.
19.Remove the keyboard.

20.Spread the retaining tabs (1) on each side of the memory module socket to release the memory module. (The side of the module opposite the socket rises away from the notebook.)
21.Slide the module away from the socket at an angle (2).
22.Remove the current memory module if the memory slot is occupied.
Note: Memory modules include security slots (3) to prevent the incorrect installation of the module into the memory module socket.
 Reverse the above procedure to install a memory module.


